When is the right time to harvest cannabis buds? This question often leaves even seasoned growers scratching their heads. Are you also asking yourself, "Could I harvest a bit earlier?"
But wait a moment before reaching for those scissors!
The timing of your harvest is absolutely crucial for maximizing the quality of your cannabis. If you harvest too soon, not only will you sacrifice potency, but the rich aroma you’ve been waiting for will be significantly lacking. Imagine spending three to four months of hard work, only to end up with a lackluster, weak product because of impatience. Frustrating, isn’t it?
On the other hand, if you delay harvesting too long, the powerful effects of your cannabis may start to diminish, leaving you with a batch more suited for sleep than the desired experience.
You’ve already invested a lot—time, effort, and resources—so it’s important to make sure you’re not just producing a jar full of sleep aids.
So, when exactly is the optimal time to harvest your cannabis? Let’s dive into this critical question to ensure your carefully nurtured buds don’t lose their potency.
1. Why Is the Timing of Cannabis Harvest So Important?
If you're knowledgeable about cannabis, you're likely aware that its effects, both recreational and medicinal, are largely attributed to two primary cannabinoids: THC and CBD (cannabidiol). The concentration of these compounds changes at different stages of the plant's development.
1). Chemical Composition Changes
Harvesting too early: If the trichomes haven't fully matured and remain clear, both THC and CBD levels will be lower than desired. This can lead to a less effective and potentially underwhelming experience when consuming or using the cannabis.
Harvesting too late: Once the trichomes shift to amber or brown, THC begins to degrade into CBN, a cannabinoid known for its calming, sedative properties.
2). Flavor and Aroma
The distinct aroma and flavor of cannabis largely stem from terpenes, the compounds that give the plant its unique scents and tastes, such as citrus, pine, or earthy undertones.
Harvesting too early: When harvested prematurely, terpenes may not have fully developed, which can diminish the characteristic flavors and aromas of the cannabis.
Harvesting too late: As terpenes degrade over time, the original scents and flavors fade, resulting in a less vibrant experience.
Proper harvest timing is crucial not only for optimizing potency but also for ensuring the desired flavor profile is preserved.
2. What Weeds Look Like When They Are Harvested
1). Bud Appearance:
The buds of a cannabis plant, commonly known as "nugs," become tightly packed and dense when they reach peak harvest readiness. These buds are coated in trichomes, which are resin glands that produce a sticky, resinous layer. This resin gives the buds a frosty, sparkly appearance, contributing to their visual appeal and potency.

2). Trichome Color:
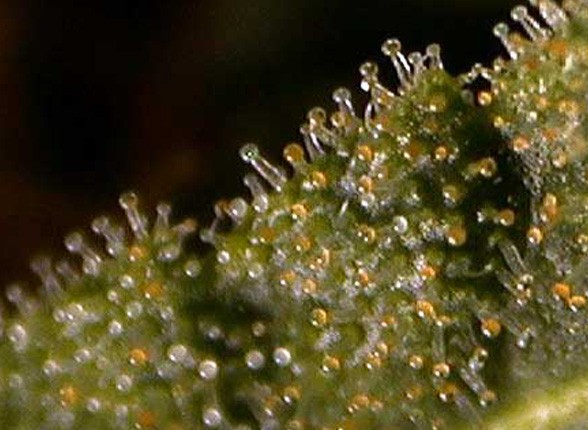
Clear: At first, the trichomes are clear, indicating that the cannabis has not yet reached the optimal harvest time.
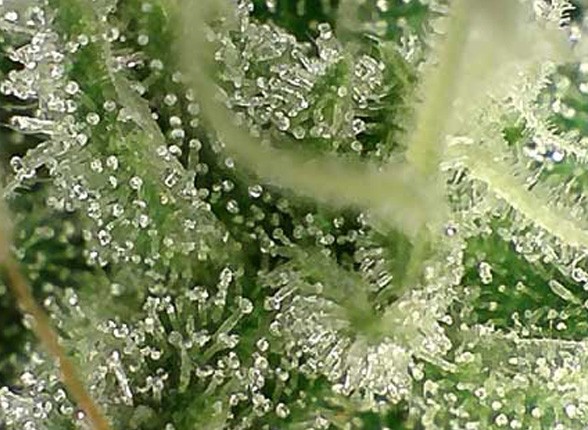
Milky white: When the majority of the trichomes appear milky white, it usually means that the active compounds like THC are at their peak potency.
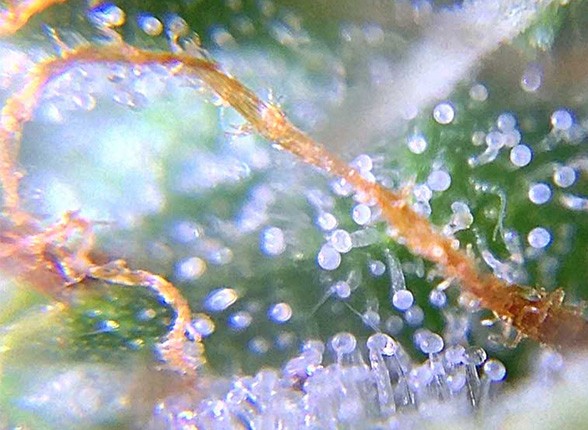
Amber: As the trichomes turn amber, THC begins to convert to CBN, reducing its psychoactive effects and producing more sedative results.
3). Hair-like Structures on the Buds:
In the early stages of cannabis flower development, the hair-like pistils appear white. As the plant continues to mature, these pistils gradually darken, shifting to shades of orange or brown, and start to curl. This change in color and shape is a key indicator that the plant is approaching harvest time.

4). Aroma:
Cannabis that is ready for harvest will emit a strong, complex scent. Terpenes release distinct aromas, and growers will notice intense herbal, citrus, woody, or other fragrances as they approach the plants.
5). Observing Trichomes with a Magnifying Glass:
To precisely determine the harvest time, it's recommended to use a magnifying glass of 30x or higher to closely observe the changes in the trichomes. Clear means the plant isn’t ready, milky white suggests it’s near its peak, and amber indicates that THC is breaking down.
3.Conclusion
At the harvest stage, cannabis will have the following key characteristics: full and dense buds, resin glands (trichomes) turning milky white, intense and complex aromas, and the resin will exhibit a shiny, frosted appearance. When these features are present, the cannabis is likely in its optimal harvest window.
4.FAQs:
1. What Weeds Look Like When They First Sprout
In the early sprouting stage, the taproot first emerges, followed by two small, round cotyledon leaves, and then the jagged-edged true leaves begin to appear.
2. What Male Weed Plants Look Like
Male cannabis plants grow taller and more slender. They develop round or oval-shaped pollen sacs at the nodes, and once mature, these sacs release pollen. Their leaves are generally less dense compared to female plants.
3. What Female Weed Seeds Look Like
Seeds themselves do not have gender; only after sprouting can a plant be identified as male or female. As the female plant enters the pre-flowering stage, white hair-like stigmas grow at the top, and the bud sites become more concentrated.
High-quality cannabis seeds are typically dark brown, gray, or black with spots or stripes, and the surface is smooth and shiny. Mature seeds are hard and resistant to pressure, whereas immature seeds are lighter in color and soft, making them easily breakable.


